Templates are a feature I only recently discovered and they can be amazing, they let you reproduce your work easily and fast, as long as you use simple expressions using the print layout's variables.
What do I mean by reproduce? Let's say you have a stunning layout, and everything is aligned just right, the map doesn't take too much space, and it's clipped with a circle just where you want it, and all the other elements are aligned just right....
And then your manager tells you the page size needs to be in A3 and not A4.
And your layout goes from this:
Now let's add another pages, simply use the Add Pages... button at the top bar and add a second page (preferably of the same size and orientation) at the end.
Make sure to set the reference point to center middle and let's start editing expressions.
The first attributes that are easiest to understand are Width and Height, we can set those to the same dimensions the page uses, for example if we just enter the @layout_pagewidth variable we can set the width.
Now we have a map in the correct width (you can go ahead and set the Height to `@layout_pageheight`), but not at the right location.
Now setting the X position is easier, if you want it to be exactly at the middle (and we are using the middle center reference point) we just have to use the following expression:
@layout_pagewidth/2
That settles it for X, but what about Y? have you tried using @layout_pageheight/2? did you see it positions your map on the first page? Good, now let's see what we can do about it. if you want to set Y position automatically, it needs an offset from the first page, that's what the layout_pageoffsets and layout_page variables are for.
@layout_page returns what page our map is currently on.
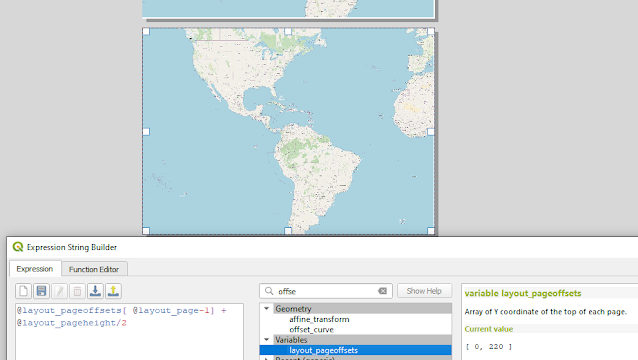
@layout_pageoffsets returns an array of offsets between pages.
If we combine these variables along with getting the center position of the page (height/2) we can forma an expression that sets our Y position.
@layout_pageoffsets[ @layout_page-1] + @layout_pageheight/2
We need to use @layout_page-1 because array indexing in the expression engine starts with 0 and page numbering starts with 1, so if we want the second value (page 2) we can find it at index position 1.
So now that we have self (kinda) aligning maps for our pages, all we have to do if want to add a third all-page map is copy these expressions, let's get started on something a bit cooler and create our 2 page map of the world. For our 2 page map of the world, we'll need to edit the expressions governing the scale and extent of our map. If you haven't done so already, center your first map (which we'll call 'Map 1') around the western part of the area you want to display. In my case it's the Americas.
Next we'll edit the properties for our second map ('Map 2', the names are important, we'll use them in the expressions) starting with Scale, since we want our maps to be continuous we need them to have the same scale.
We are going to use two expression functions to set the map scale, first we'll use item_variables('Map 1') which returns the attributes of a specific layout item (not just maps, we can use this on other items, but we can safely assume that pictures or tables won't have a map scale or CRS). What we get back from this is the expression engine equivalent of a Python dictionary or JavaScript Object, that means is has a key:value structure so we can ask for specific values by their keys, in the picture below we can see the value for the item_id key is Map 1.
We'll wrap the item_variables('Map 1') expression in a function that lets us get a specific key, it's called map_get but has absolutely no relation to maps, it derives its name from the second meaning of the word according to the Webster Dictionary. The key we are trying to get is map_scale and our final expression should look like this:
map_get(
item_variables('Map 1'),
'map_scale')
We should be getting back a number and it should set Map 2's scale to the same scale as Map 1.
Now let's get on with setting our extents, we'll need to use the same type of expression, however the returned value for map_extent is a polygon, so we are going to have to combine it with geometry functions like xmin, xmax, ymin and ymax. Setting the Y values is simply using these expressions
ymin(map_get( item_variables('Map 1'), 'map_extent'))
ymax(map_get( item_variables('Map 1'), 'map_extent'))
And we don't need to set X max, it will be set automatically by setting X min along with the map scale and size. To get a continuous map all we have to do is set the X min of Map 2 to the X max of Map 1 and that's it, we got a continuous world map (kinda, still missing east Asia, but we can reposition Map 1 to fix that).
And now that we have a horizontally split world map, we get to the main point of this post and save this layout as a template so we can reuse it in other projects, simply click the Save as template button and save the template under a descriptive name (for example 'horizontal_split_map').
To use the template in a new project (I'm using a project showing a data elevation model of Mars, but this can copied to any project) open the Layout Manager through Project -> Layout Manager and create a new layout from template, selecting the template you just created.
And now we get a split map of Mars (in Gastly colors).
Remember that when creating these templates, it's best to use variables in your expressions to make them work best in your next project, which is why the only number we used directly in expressions here was 2 and we used it to get exactly half of the page width\height.
Important note
If when loading the maps lost their position and refuse to be dragged back to it, you'll have to do this for each map, right click the Y expression in the Position and Size section to temporarily disable it, then change the page number to the correct place and right click the expression again to re-enable it and the map should pop to the correct place.


Comments
Post a Comment