The QGIS expression engine has an amazing number of functions, variables and feature attributes you can use for calculations on your layer.
But what happens when you want to calculate a new field (for example, this will apply to both selection and the geometry generator) that will require the use of a native algorithm or the use of an external API?
Will you use the processing toolbox for the algorithm or export the data, use the API and then re-import it like a chump? Will you write a python script to use once inside the QGIS python console and then lose in your file system? NO.
Let's Write A New Expression Function
Exmaple 1: Using A Native Algorithm
I got here by trying to find the dissolve function in the expression engine, I know there are ways to compensate for the lack of that function but I thought it would be easier to understand how to use a function with the same name.
To get the function I wanted I decided to learn how to write custom expression functions. The first thing you have to do is open the expression engine, either with a select by expression, the filed calculator or even through the layer styling panel. Once you open the expression engine and switch to the Function Editor tab, just click the green plus and you will see the following base script QGIS provides:

All that function does is take two values and sums them together. which is nice, but I wanted to use a processing algorithm. to do that I went to the Cheat sheet for PyQGIS. Using the cheat sheet, I checked what I really needed to pass to the native Dissolve algorithm, It's relatively easy to get the help for an algorithm, just two lines:
What you get back is all the parameters to pass to the algorithm and what output will you get. this is the help for "native:dissolve" (minus a few line breaks so it would all fit in one picture):

What we see here is that you can specify a layer by name or ID (which you can get from the Map Layers tab in the expression options) and specify the output to memory, which lets us get back the output layer and its geometry.
If we looks at run algorithm example in the cheat sheet we can see that specifying parameters should be done inside a dictionary like so:
Which is pretty much what I wanted to get, but with dissolve instead of buffer,
so this example is pretty close to what we need already. That means that our custom function is basically done by now, all we have to do is get back only the geometry from the layer and not the dissolved layer itself. for that we'll check out what our output (QgsProcessingOutputVectorLayer) actually is.

So the page for QgsProcessingOutputVectorLayer doesn't really tell us a lot, but we know that it's basically just a vector layer, so let's check out how QGIS defines vector layers (hint: PyQGIS defines class names with qgs*name in camel case*).
If you followed the hint, you probably got to QgsVectorLayer, and looking at its methods we can find what we need:

Like I stated earlier what we want is just the geometry, which we can get with :
But we still need to specify the feature ID (fid) for the feature we want, we can know what that fid is with a simple method.
We used Dissolve, meaning we only have one feature, so the fid is 1.
Let's put all our code together and see what our custom dissolve function looks like, I also added some help in HTML so We could remember what is the input and what is the output of our function.
Our function takes only one parameter (layer which is a layer name or layer ID) and returns the dissolve of all of its geometries.

While what I showed here is just using one processing algorithm, you can use this method to chain several algorithms (like reprojecting our geometry after dissolving it) and shorten some of our expressions to help make our work process faster.
Exmaple 2: Calling An API
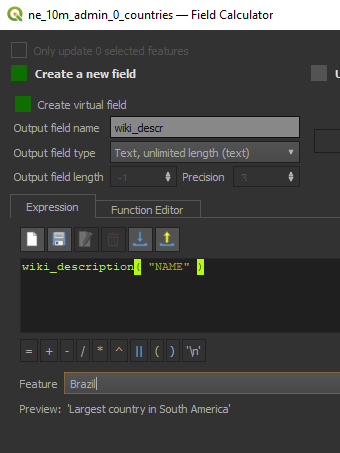
Let's say we have the Natural Earth Admin-0 Countries layer, and we want a new virtual field in it that takes the name of each country and returns its description from wikipedia, you could also get the actual page or the main image, but the wikipedia description is a short one-liner that's easy to append over 200+ rows of data.
Using the wikipedia API and python requests we can create a simple function (even simpler than part 1) that returns this description for each country.
We can use wikipedias API documentation and sandbox to check out how our query should behave.
I now know I want to perform the query action, I want the description property (prop) and I want to get back a json object (format url parameter). I also know that the titles url parameter is what I need to use for my search term. My url should now look like this (Let's take Italy for example):
https://en.wikipedia.org/w/api.php?action=query&titles=Italy&prop=description&format=json
and when used in the browser this is what I get back:

That is the JSON Object I should get back when using this url with a HTTP GET request in QGIS. making a HTTP GET request is as easy as:
Note about HTTP requests in QGIS
While using the requests Python library is possible for creating simple HTTP requests, it is not the recommended way while creating them within QGIS.
QGIS has a native class called QgsNetworkAccessManager meant for creation and manipulation of network requests. While it is not as simple to use the QgsNetworkAccessManager as it is to use requests, I am adding below examples for synchronous requests using it so you could use those instead of the requests, especially if you are building plugins.
You can see that instead of:
We can use the native:
It's a bit longer, but returns the same result and has the pros of letting QGIS handle everything that is related to the proxy which can cause a lot of issues when creating these requests.
Continuing with the parsing
Navigating through the JSON to get the description is also pretty easy.
From the response we get the JSON with response.json()
What we get then is a python dictionary which we can navigate with the following statements:
This is pretty much the trickiest part, since we don't know the page number we have to get the key of the first page in the response -> query -> pages.
Once we have that, we just use it and return the description.
and that's it, the entire function is:
In use, it looks like this:

Or, when using the "NAME" attribute from the layer:

And that's it, simple, custom functions in your expression engine which can be customized to do pretty much what ever you want.
Writing the function help
It's been 3 years since I first published this post, and while some things have changed, most have not and it's still mostly relevant.
You can however notice that I have changed the example of using an external API from using the requests python library to using the native QgsNetworkAccessManager which is also the recommended method if you are writing a script or building a plugin.
A second note you will notice at the code of the first example, is that the args parameter of the qgsfunction decorator was deprecated in QGIS 3.32. This is less of a deal than it seems, and the new syntax for using the decorator appears below as it should, and if you have functions that require specific field, check the official documentation for how it should be written.
You would also notice that the example below only imports what is necessary for the function, I recommend doing this as well to avoid heavy import (like all of qgis.core just for the qgsfunction decorator).
Another note I wanted to add was an example of how to write the docstring for your function so it would look the same as the native QGIS expression engine functions.
This is relatively simple as well, and requires some basic knowledge of HTML tags and using classes in tags.
If you created the wiki_description like the example above, you should have it in your QGIS and if you open its help in the expression builder window it should look like this:

That doesn't look as good as the native functions, but it gets the general message across.
Let's assume for a moment that you want your help to look like the native functions, they look better, it's clear how to read and use their arguments and they are more colorful than the relatively bland black and green over white.
We can get that look with relative ease, all with HTML tags and some classes that are already used for the native functions.
Let's break down the elements we see in the help of a native function that are not simple text, we have:
- Section headers - Syntax, Arguments, Examples
- Example usage in the Syntax section, with the function name in a bold blue font and the arguments/parameters in red italics
- A list of the arguments and their description, with the argument name again in red italics
- A bulleted list of examples and their expected result separated by an arrow to the right (→)
That's not a lot to know and keep track of, so let's start with the section headers.
The sections header are actually just a simple h4 tag, which actually means you can add your own sections if you have anything else to add.
We are going to start with the Syntax section anyway, so might as well display how its section header will look like in your code.
That's it. nothing special about it, QGIS simply styles h4 tags as section headers, i.e. the smaller gray rows with the bold green text inside.
Notice that when I write inside it means the content (tags or text) should be between the opening (<h4>) and closing tag (</h4>). HTML tags are closed by using the same tag name with the syntax of less-than sign (<), slash (/), that tag name (h4 in this case, but you'll see others below) and lastly a greater-than sign (>).
Below header we are going to open a new div tag with a class of syntax, you can already add the closing tag so you won't miss it, so you docstring should now look like this:
Simple, right?
So let's add the actual syntax inside it. We are adding the syntax inside a code tag and each part of it (function name, each argument) will have its own span tag with the class that it should have. You can add line breaks here to make the docstring easier to read, they are ignored when the help is generated.
Unsurprisingly, the class name for the function's name is functionname and for the arguments it's argument, brackets are written as is inside the code tag. Remember, the span tags go inside the code tag, which is inside the div tag.
Using those tags and class names, you docstring should look like this:
You can also see I added the comment about optional arguments, it should be as is right below the code tag, and it's actually just copied from the QGIS source code (which is how I had to learn how the docstrings are constructed).
Moving on to the Arguments section, just like Syntax it starts with a header inside a h4 tag, and right below it a div with the class of (surprise surprise) arguments. Inside the arguments div tag, we actually have a table of all the arguments and their descriptions. This is just a simple table with 2 columns and no header row, which makes a lot of sense, since it keeps overflow from making the argument description harder to read.
The table is constructed in the most basic manner, where a table tag wraps the tags for each row (we only have one, but your function might have more) which is a tr tag (short for "table row") which itself wraps two td (table data) tags, where the first one has the argument class.
Following those rules, the Arguments section will look like this:
You can, and should, add rows (as in tr tags, not just line breaks) for each of your arguments, but the current example only has one.
Last but not least, we get to the Examples section, which just like the other sections has a h4 header and a wrapper div tag with the examples class.
Inside the wrapper div, we have an ul tag for an unordered (bulleted, as opposed to an ordered/numbered) list and within it we add a li (list item) tag for every example we want to add.
Here we don't have any internal tags, but inside the examples, the example itself (which should be the exactly how you would use it inside the expression builder) is separated from the expected result by a right arrow.
The most complex part here is actually the right arrow, which is not simply a hyphen and a greater-than sign combined, but a UTF-8 right arrow (→ and not ->, I think you can see why).
To use the right arrow inside the example we simply add the following between the texts for the example and the result:
So the full text of the Examples sections should look like this:
So the full code of the function, including the docsting should now look like this:
And the help for it should now look a lot better when you look at it:

I hope these additions were helpful to those of you still looking at this post, I went back to it when writing other content and figured an update was in order.
If you have any notes about this post, I would love to hear them either through the comments or by contacting me through an email.
Exploring The QGIS Expression Engine, Part 1: Getting Values From JSON & HSTORE
Exploring The QGIS Expression Engine, Part 2: What's Missing From Select By Location
Comments
Post a Comment